Packing every feature possible into a event website cloud platform can make it more complicated and difficult to use. That’s why Event Smart DOES NOT force you to pay nor see features you don’t want. The Event Smart user interface is–well–smarter because it adapts to your needs and the features you want to use.
We’ve highlighted four reasons Event Smart is great, including: 1) The Essential Online Event Registration and Ticketing Features are Free, 2) You Don’t Pay for Features You Don’t Use or Want, 3 & 4) you can sell an unlimited number of Paid events and tickets for free. However, in addition, Event Smart’s online event ticketing and registration cloud is great because: 5) the user interface can be customized to be more simple or more advanced based on the features you subscribe to, and 6) you can control what features and options you see on each screen (we’ll talk about that next time).
A User Interface that Changes Based on Your Subscription to Features
Online event registration and event ticketing software for classes, conferences, festivals, parties, sporting events, etc. can be complex. Sometimes you need lengthy registration forms to collect detailed attendee registration information to provide your audience a great experience, and sometimes all you need is the attendee’s name and email address to sell tickets online.
Whatever your situation is, or whatever features you need, the Event Smart user interface adapts depending on the features you have subscribed to.
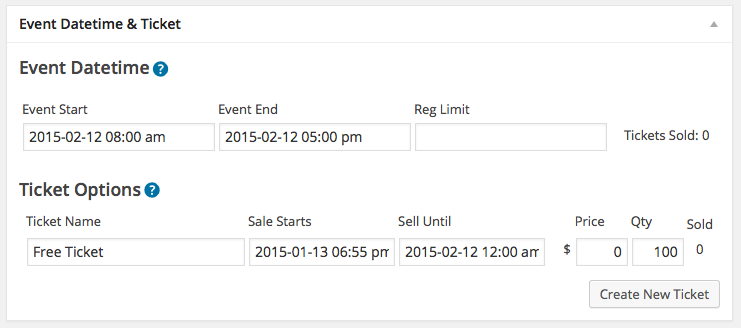
Here is an example of the Basic Ticket Editor compared to the Advanced Ticket Editor and how they adapt to your needs.
Basic Ticket Editor vs. Advanced Ticket Editor
The Basic Ticket Editor works perfectly for simple events. To configure the event dates and ticket options with the Basic Ticket Editor you simply:
- Select the start and end dates of your event
- Add a registration limit (optional)
- Name your ticket
- Select the dates that your ticket(s) start to sell and when they end selling
- Add a ticket price (optional)
- Add a ticket quantity available (optional)
You can repeat steps 3-6 to add additional ticket options for a single event, but additional tickets are optional. Smart, eh?
The Advanced Ticket Editor works perfectly for more advanced events. To configure the event dates and ticket options with the Advanced Ticket Editor you simply:
- Name the event datetime (optional)
- Select the start and end dates of your event
- Add a registration limit (optional)
- Add a datetime description (optional)
- Add more datetimes (optional)
- Name your ticket
- Select the dates that your ticket(s) start to sell and when they end selling
- Add a ticket price (optional)
- Add a ticket quantity available (optional)
- Add a ticket description (optional)
- Indicate # Datetimes (times a ticket can access other datetimes created above) (optional)
- Indicate minimum and maximum quantity of tickets allowed to be purchased in one checkout (optional)
- Indicate whether the ticket is required (optional)
- Indicate whether a ticket is taxable (optional)
- Assign datetimes which the ticket can access
- Designate a new default ticket to be created for future events (optional)
As you can see, there are a LOT of options that don’t get in the way if you don’t need them. But if you do want advanced control over the dates and tickets for your events, then the best features are made available. It’s smart to simplify the user interface whenever possible.


Leave a Reply